Tuesday, 19 November 2013

Hover image got something

7 Comment(s) so far


Assalamualaikum dan hai semua...harinie nak buat tutorial yang agak awesome pulak...awesome ker?

This is a tutorial about something hidden behind an image...wow...its sound really mysterious... :D
Harsh Warning : No re-post / re-tutor !!
Hover Below Picture for a live preview


Put anything here like text,cbox code,ask.fm code or etc

For template designer :
www.blogger.com/home --> Layout --> add gadget --> HTML/Javascript

For blogskin :
www.blogger.com/home --> Template --> Paste it anywhere you want it to appear

The Code

<style type="text/css">
.outer {
height:210px;
width:210px;
border:5px solid #FFE6E9;
-webkit-transition: all 0.4s ease-in-out;
 -moz-transition: all 0.4s ease-in-out;
 -o-transition: all 0.4s ease-in-out;
 -ms-transition: all 0.4s ease-in-out;
 transition: all 0.4s ease-in-out;
}

#output {
background-image: url(http://31.media.tumblr.com/tumblr_ldoxjm32p81qba4k7o1_400.png);
background-position: 50% 50%;
background-size: 340px;
background-color: #FFFFFF;
}
.input {
width:100%;
height:95%;
font:13px candara;
color: #000000;
text-align:center;
padding-top:10px;
 -webkit-transform: scale(0);
 -moz-transform: scale(0);
 -o-transform: scale(0);
 -ms-transform: scale(0);
 transform: scale(0);
 background-image: url(http://25.media.tumblr.com/tumblr_lq95jyYtdA1qbste0o1_400.jpg);
 background-size:320px;
 -webkit-transition: all 0.4s ease-in-out;
 -moz-transition: all 0.4s ease-in-out;
 -o-transition: all 0.4s ease-in-out;
 -ms-transition: all 0.4s ease-in-out;
 transition: all 0.4s ease-in-out;
}
.outer:hover .input {
 -webkit-transform: scale(1);
 -moz-transform: scale(1);
 -o-transform: scale(1);
 -ms-transform: scale(1);
 transform: scale(1);
}
</style>

<center><div class="outer" id="output"><div class="input">
<div style="background:#EEEEEE;">
Put anything here like text,cbox code,ask.fm code or etc
</div></div></div></center>

The Note
Blue text : Width , height of the image and background
Fuchsia text : Color code FIND HERE
Green text : Background image URL
Red text : Put anything you want

Preview and save when done...comments and credit are really appreciated...

Thursday, 14 November 2013

Freebies header

12 Comment(s) so far

Assalamualaikum dan hai semua... :-) sekarang nie kan tengah cuti sekolah...jadi adalah masa nak buat freebies header...header nie inspiration dari Alia Eyra sebabtu nampak macam sama...

I make this header by myself...so, don't re-contribute or re-freebies...

If you want to copy header url...
Firstly click image --> Right click --> Copy image URL / Copy image location...

If you want to save the header...
Click image --> Right click --> Save image as...

Width : 900px , Height : 400px
Font for My Life Diary : Miss Smarty Pants
Font for description :  Fanande


CLICK HEADER IMAGE FIRST TO GET THE ACTUAL SIZE

Don't forget to comment and credit me if you are using this header...^^,
Hope you like it...

Tuesday, 12 November 2013

Put cute blog list...

14 Comment(s) so far


Assalamualaikum dan hai semua...okay tadi ada yang request kat cbox...dia tanya macam mana nak letak bloglist dalam blogskin...okay so, here the tutorial...

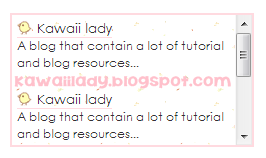
This style doesn't look exactly like the style of the default style in template designer because there is no latest blog entry name and feed...

 1.   For template designer : Log in blogger --> Layout --> Add Gadget --> HTML/Javascript
 2.   For blogskin : Log in blogger --> Template
 3.   Copy below code and paste it in HTML/Javascript gadget or between sidebar code for blogskin...
Style number one ( Only blog name )


<style>
.bloglist {
width:200px;
border:2px dotted #FFDAE0;
padding:10px;
text-align:left;
background:url(http://i.imgur.com/2EShx.png);
}
a.name {
font:13px century gothic;
letter-spacing:1px;
text-align:left;
color:#333333;
text-decoration:none;
padding-left:20px;
background:url(http://media.tumblr.com/62008af8ba59684acaa500115373b228/tumblr_inline_mnvwkh8qjb1qz4rgp.gif);
background-repeat:no-repeat;
background-size:15px;
-moz-transition: all 0.5s ease-in-out;
-o-transition: all 0.5s ease-in-out;
-ms-transition: all 0.5s ease-in-out;
transition: all 0.5s ease-in-out;

}
a.name:hover {
padding-left:30px;
background:url(http://media.tumblr.com/tumblr_lkl6qodkIv1qfamg6.png);
background-repeat:no-repeat;
background-size:15px;
}
</style>
<center>
<div class="bloglist">
<a class="name" href="http://kawaiilady.blogspot.com">Kawaii lady</a>
<br />
<a class="name" href="http://kawaiilady.blogspot.com">Kawaii lady</a>
<br />
<a class="name" href="http://kawaiilady.blogspot.com">Kawaii lady</a>
<br />
<a class="name" href="http://kawaiilady.blogspot.com">Kawaii lady</a>
<br />
</center>
</div>

Style number two ( With blog description )


<style>
.bloglist {
width:230px;
height:120px;
border:2px solid #FFDAE0;
padding:5px;
text-align:left;
overflow-y:scroll;
overflow-x:hidden;
background:url(http://i.imgur.com/2EShx.png);
}
a.name {
font:13px century gothic;
text-align:left;
color:#333333;
border-bottom:1px solid #FFDAE0;
text-decoration:none;
padding-left:20px;
background:url(http://media.tumblr.com/62008af8ba59684acaa500115373b228/tumblr_inline_mnvwkh8qjb1qz4rgp.gif);
background-repeat:no-repeat;
background-size:15px;
}
.description {
font:12px century gothic;
text-align:left;
color:#333333;
background:#FFFFFF;
text-decoration:none;
}
</style>
<center>
<div class="bloglist">
<a class="name" href="http://kawaiilady.blogspot.com">Kawaii lady</a>
<div class="description">A blog that contain a lot of tutorial and freebies...
</div><br />
<a class="name" href="http://kawaiilady.blogspot.com">Kawaii lady</a>
<div class="description">A blog that contain a lot of tutorial and freebies...
</div><br />
<a class="name" href="http://kawaiilady.blogspot.com">Kawaii lady</a>
<div class="description">A blog that contain a lot of tutorial and freebies...
</div><br />
<a class="name" href="http://kawaiilady.blogspot.com">Kawaii lady</a>
<div class="description">A blog that contain a lot of tutorial and freebies...
</center>
</div>
</div>

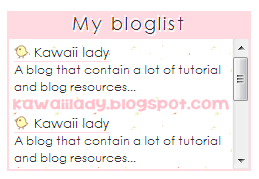
Style number three ( With description and title )


<style>
.bloglist {
width:230px;
height:120px;
border:2px solid #FFDAE0;
padding:5px;
text-align:left;
overflow-y:scroll;
overflow-x:hidden;
background:url(http://i.imgur.com/2EShx.png);
}
.btitle {
width:240px;
font:18px century gothic;
background:#FFDAE0;
padding:2px;
letter-spacing:2px;
color:#333333;
text-shadow:1px 2px 0px #FFFFFF,-1px -2px -0px #FFFFFF;
}
a.name {
font:13px century gothic;
text-align:left;
color:#333333;
border-bottom:1px solid #FFDAE0;
text-decoration:none;
padding-left:20px;
background:url(http://media.tumblr.com/62008af8ba59684acaa500115373b228/tumblr_inline_mnvwkh8qjb1qz4rgp.gif);
background-repeat:no-repeat;
background-size:15px;
}
.description {
font:12px century gothic;
text-align:left;
color:#333333;
background:#FFFFFF;
text-decoration:none;
}
</style>
<center>
<div class="btitle">My bloglist</div>
<div class="bloglist">
<a class="name" href="http://kawaiilady.blogspot.com">Kawaii lady</a>
<div class="description">A blog that contain a lot of tutorial and freebies...
</div><br />
<a class="name" href="http://kawaiilady.blogspot.com">Kawaii lady</a>
<div class="description">A blog that contain a lot of tutorial and freebies...
</div><br />
<a class="name" href="http://kawaiilady.blogspot.com">Kawaii lady</a>
<div class="description">A blog that contain a lot of tutorial and freebies...
</div><br />
<a class="name" href="http://kawaiilady.blogspot.com">Kawaii lady</a>
<div class="description">A blog that contain a lot of tutorial and freebies...
</center>
</div></div>

The notes :

Red text : The width and height of the blog list
Blue text : The color code FIND HERE
Purple text : Background URL HERE or search at Google
Green text : Mini icon URL FIND HERE
Fuchsia text : Blog link
Orange text : Blog name
Pink textBlog link
Turquoise text : Blog description

Preview and save when you're done... ^^
Just ask if you don't understand...

Friday, 8 November 2013

Tutorial: Customize tooltips

9 Comment(s) so far


Assalamualaikum dan hai semua ! dah lama tak update entri...sebelum nie ada ujian akhir tahun, kenalah study sebab tahun depan dah nak SPM...

Okay this time I want to make a tutorial on how to customize tooltip...Tooltip is a title of link

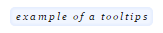
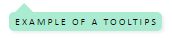
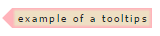
Example of the default tooltips

Follow below steps to customize the tooltips...

  1. Sign in blogger.com
  2. Choose template --> edit HTML
  3. Search  </head>  for template designer or </html>  for blogskin
  4. Copy below code

<script src="http://ajax.googleapis.com/ajax/libs/jquery/1.7/jquery.min.js"></script>
<script type="text/javascript" src="http://static.tumblr.com/7qjmkr5/IUmmdsy41/jquery.style-my-tooltips.js"></script>
<script>
    (function($){
        $(document).ready(function(){
            $("[title]").style_my_tooltips();
        });
    })(jQuery);
</script>
Paste the code after / below </head>  for template designer and after </html>  for blogskin

   5.  search  ]]></b:skin> for template designer or  </style>  for blogskin
   6.  Copy any code below and paste it before / above the code that you search

Style 1

.tooltip{
display: inline;
position: relative;
}
#s-m-t-tooltip {
   min-width:70px; /*the smallest the tooltip can be*/
   max-width:300px; /*the biggest the tooltip can be*/
   background: #F1F6FF;/* change the background color */
    font-size: 10px;/* change the font size */
    line-height: 13px;
    box-shadow:inset 0px 0px 2px 2px #E6EEFF;
    font-style:italic;
    font-family: Georgia;/* change the font */
    letter-spacing: 2px;
    text-transform: lowercase;/* can be lowercase, uppercase, none */
    color: #222222;/* change the text color */
    text-align: center;
    padding: 3px 4px 3px 6px;
    display: block;
    z-index: 100;
    border-radius: 5px;
    position: absolute;
    margin-left:10px;
    margin-top:16px;
}

Style 2

.tooltip{
display: inline;
position: relative;

}
#s-m-t-tooltip {
min-width:70px; /*the smallest the tooltip can be*/
max-width:300px; /*the biggest the tooltip can be*/
-moz-border-radius:5px;border-radius:5px;
-webkit-border-radius:5px; /*change your border radius*/
padding: 3px 4px 3px 6px; /*padding inside tooltip*/
margin:25px 0px 0px 25px; /*distance from link, adjust triangle bottom value if you fiddle with this*/
background: #aaebd1; /*background color*/
font-family:calibri; /*tooltip font*/
font-size:10px; /*tooltip font size*/
letter-spacing:2px; /*tooltip letter spacing*/
text-transform:uppercase; /*makes the tooltip title uppercase*/
color:#000000; /*tooltip font color*/
text-align: center;
-webkit-box-shadow: 2px 2px 3px #eeeeee;
-moz-box-shadow: 2px 2px 3px #eeeeee;
box-shadow: 2px 2px 3px #eeeeee;
}
#s-m-t-tooltip:after {
position: absolute;
display: block;
content: "";
border-color: transparent transparent  #aaebd1 transparent ;
border-style: solid;
border-width: 12px; /*changes size of triangle*/
height:0;
width:0;
position:absolute;
bottom: 16px;
left:3px;
}

Style 3

.tooltip{
display: inline;
position: relative;
}
#s-m-t-tooltip {
   min-width:70px; /*the smallest the tooltip can be*/
   max-width:300px; /*the biggest the tooltip can be*/
    background: #EEDFC3;/* change the background color */
    font-size: 10px;/* change the font size */
    line-height: 14px;
    box-shadow:inset 0px 0px 2px 2px #FFB4BB;
    font-family: Tahoma;/* change the font */
    letter-spacing: 2px;
    text-transform: lowercase;/* can be lowercase, uppercase, none */
    color: #222222;/* change the text color */
    text-align: center;
    padding: 3px 4px 3px 6px;
    display: block;
    z-index: 100;border:none;
    position: absolute;
    margin-left:30px;
    margin-top:20px;
}
#s-m-t-tooltip:before {
position: absolute;
display: block;
content: "";
border-color: transparent #FFB4BB transparent transparent ;
border-style: solid;
border-width: 10px; /*changes size of triangle*/
height:0;
width:0;
position:absolute;
bottom: 0px;
left:-20px;
}

Style 4

.tooltip{
display: inline;
position: relative;
}
#s-m-t-tooltip {
   min-width:70px; /*the smallest the tooltip can be*/
   max-width:300px; /*the biggest the tooltip can be*/
    background-color: #EA9D9D;/* change the background color */
    font-size: 10px;/* change the font size */
    line-height: 14px;
    box-shadow: 2px 2px 2px 1px #FFC0C0;
    font-family: Tahoma;/* change the font */
    letter-spacing: 2px;
    text-transform: uppercase;/* can be lowercase, uppercase, none */
    color: #FFFFFF;/* change the text color */
    text-align: center;
    padding: 3px 5px;
    display: block;
    border-radius:0px 6px;
    z-index: 100;border:none;
    position: absolute;
    margin-left:20px;
    margin-top:20px;
}

Edit the code :
Color code here
Red text : Color of the background
Purple text : Color of the text
Fuchsia text : Font name
Orange text : Box shadow color
How to use tool tips?

Copy below code and paste it anywhere you want it to appear...

<a href="http://kawaiilady.blogspot.com/" title="KawaiiLady ♥">Hover here !</a>

Or for image :
<img src='IMAGE URL' style='border:0px; box-shadow:0px 0px #ffffff;' title='Title Tooltip'/>

The blue highlighted text : the link...
The pink highlighted text : the title of the tooltips...
Hover here change with the text that you want to add tooltip title
Image URL change with the image that you want to add tooltip title

Okay then, preview and save when you're done... ^^
Any questions ? comments below...

Sunday, 13 October 2013

Updated version

Be the first to comment!

Assalanualaikum dan hai semua...sekarang nie saya dalam proses mengupdate entry-entry lama menjadi version baru yang lebih baik...

Antara entri yang saya dah update ialah :


Saya update tutorial nie sebab saya baru perasan rupanya code yang saya bagi sebelum nie salah...nasib baik ada yang bagi tahu kat comment...


Tutorial nie pulak saya update sebab style yang lama tuw macam tak kreatif dan kurang menarik...Penat saya godeh-godeh code nie...jadi, kalau guna creditlah yer...^^  dan yang paling penting HARAM copy tutorial nie dan post di blog anda...gunalah kreativiti sendiri untuk buat tutorial...


Tutorial nie pown saya update sebab saya rasa style yang lama tuw macam tak kreatif dan kurang menarik...tutorial nie pown kalau nak guna credit taw...HARAM copy tutorial nie dan post di blog anda...

Sekarang nie pown saya tengah update tutorial-tutorial lama jadi lebih mudah difahami...Kalau nak tanya apa-apa tentang blog, nak request tutorial atau freebies ker boleh dibuat disini...

Sekarang nie saya tengah dalam fasa peperiksaan akhir tahun...jadi kalau nak request header ker cursor ker buatlah sekarang sementara saya tengah cuti nie...

Tau tak nak letak credit macam mane? kalau tak tau meh saya ajar...

Ways to put credit :
Add below code into your sidebar section for blogskin and sidebar widget for template designer...

<center>Some help : <a href="http://kawaiilady.blogspot.com/">Kawaii Lady ❤</a>
| <a href="CREDIT LINK">NAME ❤</a> | <a href="CREDIT LINK">NAME ❤</a></center></center>

Red text : The URL of the site that you want to put in the credit...
Blue text : The name of the credited site...

Dah tau kan cara nak letak credit ? Jadi jangan lupa untuk kredit kepada blog saya jika anda menggunakan tutorial atau freebies dari blog ini...Okay assalamualaikum semua...jumpa lagi di  entry seterusnya...

Tuesday, 8 October 2013

4 blockquote style 2

12 Comment(s) so far

Assalamualaikum and hi people..tadi masa tengah ubah style blockquote saya, muncullah beberapa style blockquote yang baru...
If you don't know what is blockquote...This is the blockquote...A cute box in a post to insert quote or code...Let's customize your blockquote style...
But, firstly you should know how to use blockquote...so let me teach you... :-)

Dashboard --> Make a new post

Highlight the text that you want to put in the blockquote


Then, click on the punctuation mark like below...
Only click once to avoid doubled blockquote...


How to customized blockquote style? follow below instuction...

1.   Search your bockquote code...
      .post blockquote {   or  blockquote { or anything relate to blockquote
2.   Then, delete the old blockquote code and replace with the new code that I have give
3.   If there is no bockquote code in your template, just add the code that I give before / above
      </style>  for blogskin  and   ]]></b:skin> for template designer